Media refers to a media item in the Media Library. So, when you click on Media in the left sidebar, you will see the WordPress Media Library, i.e. all of the media items uploaded via the Media Library to your site.
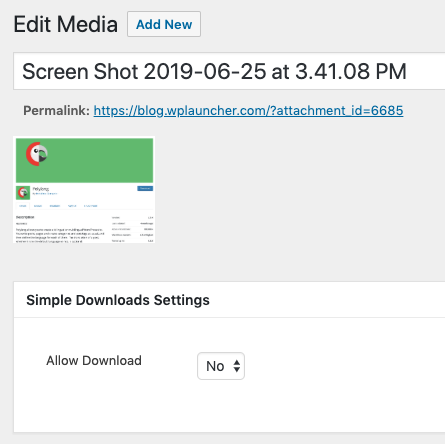
A meta box in WordPress’ media library is often what appears under an image or file that has been uploaded to WordPress’ media library. It’s helpful for some plugins to add meta boxes to media files in order to extend the default functionality of the media items. As you see below, the Simple Downloads plugin has a Simple Downloads Settings meta box that appears underneath the Screen Shot image and asks whether users would like to allow a download:
There are 5 steps involved in adding a meta box in WordPress’ Media library with a plugin. All of the code snippets shown below need to be added to your class-plugin-name-admin.php file. Again, we’re using the WordPress plugin boilerplate as the framework for our plugin as it’s super solid, really well organized, and makes creating WordPress plugins a breeze.
Check out our post introducing working with the WordPress Plugin Boilerplate if you would like to learn more.
Step 1: Add add_meta_boxes_attachment function to _construct method
The code below allows you to hook into the add_meta_boxes_attachment action so that you can add meta box to all media items in the media library.
add_action('add_meta_boxes_attachment', array( $this, 'setup_attachment_metaboxes' ));
Step 2: Add setup_attachment_metaboxes function
The add_meta_box WordPress function below is where you actually add the meta box to the media library.
public function setup_attachment_metaboxes(){
		add_meta_box('attachment_meta_box', 'Link Tracking Settings', array($this,'attachment_data_meta_box'), 'attachment', 'normal','high' );
	}
The different parameters for the add_meta_box function are visible below:
add_meta_box( string $id, string $title, callable $callback, string|array|WP_Screen $screen = null, string $context = 'advanced', string $priority = 'default', array $callback_args = null )Step 3: Add attachment_data_meta_box function
This is where you add the HTML elements and inputs that will appear within your meta box. The plugin_name_render_settings_field that you see below is required and makes the pre-population of input elements super easy and is included in the following post: https://blog.wplauncher.com/add-meta-box-wordpress-custom-post-type/
	public function attachment_data_meta_box($post){
		// Add a nonce field so we can check for it later.
		wp_nonce_field( $this->plugin_name.'_attachment_meta_box', $this->plugin_name.'_attachment_meta_box_nonce' );

		echo '<div class="attachment_field_containers">';
		echo '<ul class="'.$this->plugin_name.'_data_metabox">';

		echo '<li><label for="'.$this->plugin_name.'_image_source">';
		_e( 'Image Source', $this->plugin_name.'_image_source' );
		echo '</label>';
		$args = array (
	        'type'      => 'input',
				  'subtype'	  => 'text',
				  'id'	  => $this->plugin_name.'_image_source',
				  'name'	  => $this->plugin_name.'_image_source',
				  'required' => '',
				  'value_type'=>'normal',
				  'wp_data' => 'post_meta',
				  'post_id'=> $post->ID
						);

			  // this gets the post_meta value and echos back the input
		$this->plugin_name_render_settings_field($args);
		echo '</li></ul></div>';

	}
Step 4: Add edit_attachment action to _construct method
Typically when you save a post type, you hook into that saving process with save_post_custom_post_type. However, with media items, or what WordPress refers to as attachments, you need to use a different process. In this case, you use the edit_attachment action in order to save any inputs in your meta box.
add_action( 'edit_attachment', array( $this, 'save_attachment_meta_box_data') );Step 5: Add save_attachment_metabox_data function
This is where you actually save the inputs in your meta box. When you click on Publish or Update, your input will be passed to this function, so you need to save your input to the WordPress database and update your post meta key value pair.
public function save_attachment_meta_box_data($post_id ) {
		/*
		 * We need to verify this came from our screen and with proper authorization,
		 * because the save_post action can be triggered at other times.
		 */

		// Check if our nonce is set.
		if ( ! isset( $_POST[$this->plugin_name.'_attachment_meta_box_nonce'] ) ) {
			return;
		}

		// Verify that the nonce is valid.
		if ( ! wp_verify_nonce( $_POST[$this->plugin_name.'_attachment_meta_box_nonce'], $this->plugin_name.'_attachment_meta_box' ) ) {
			return;
		}

		// If this is an autosave, our form has not been submitted, so we don't want to do anything.
		if ( defined( 'DOING_AUTOSAVE' ) && DOING_AUTOSAVE ) {
			return;
		}

		// Check the user's permissions.
		if ( ! current_user_can( 'edit_post', $post_id ) ) {
			return;
		}

		// Make sure that it is set.
		if ( !isset( $_POST[$this->plugin_name.'_image_source'] )) {
			return;
		}

		/* OK, it's safe for us to save the data now. */

		// Sanitize user input.


		$img_source = sanitize_text_field( $_POST[$this->plugin_name."_image_source"]);

		update_post_meta($post_id, $this->plugin_name.'_image_source',$img_source);

	}
That’s all there is to it! Now, you can add meta boxes to all media items in the WordPress media library.
Next, expand your WordPress plugin by learning how to add WordPress Admin Post Actions in https://blog.wplauncher.com/add-wordpress-admin-post-action/.