It goes without saying, the homepage is pretty much always our favorite part of any website that we build. It’s the face of your website. It’s the main page. It’s the front door. It’s your billboard in the endless ether that is the internet.
Whenever we start a new web project, we start with the homepage. The homepage’s personality and style drives the rest of the website. The homepage needs to communicate quickly and concisely what you’re website is and does so that visitors know why they are there.
Create a Nectar Slider
You’ll notice in the demo site for the blog that we’re building, the first thing you see is a beautiful full page photograph with a title and tagline. To achieve this look and feel, we need to create a slider element. A slider is basically a side-scrollable gallery that can contain one or more images.
PRO TIP
By now you probably saw that sweet typewriter photo we used for our Blog Launch guide and you might have even wondered, where did you guys get that sweet typewriter photo? Did you guys take a picture of that typewriter? Did you buy a sweet old typewriter just to take a picture of it? No, we didn’t you silly goose, and we aren’t photographers, so it wouldn’t have looked nearly as vintage if we took a picture of it!
So, here’s our secret, not so secret anymore, weapon for awesomely, amazing stock photos. We use a site called Unsplash.com. Unsplash.com has a treasure trove of high resolution images that are royalty free. Yes, you heard me right, these are completely FREE!! Our favorite word! So, feel free to use that typewriter image that we did or snag up another beautiful image.
Checkout the amazingly awesome Unsplash
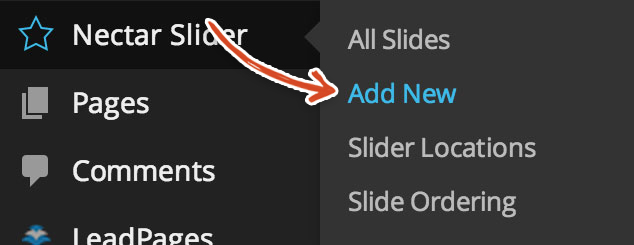
To create a slider, hover over Nectar Slider in the left sidebar and click on the Add New link.
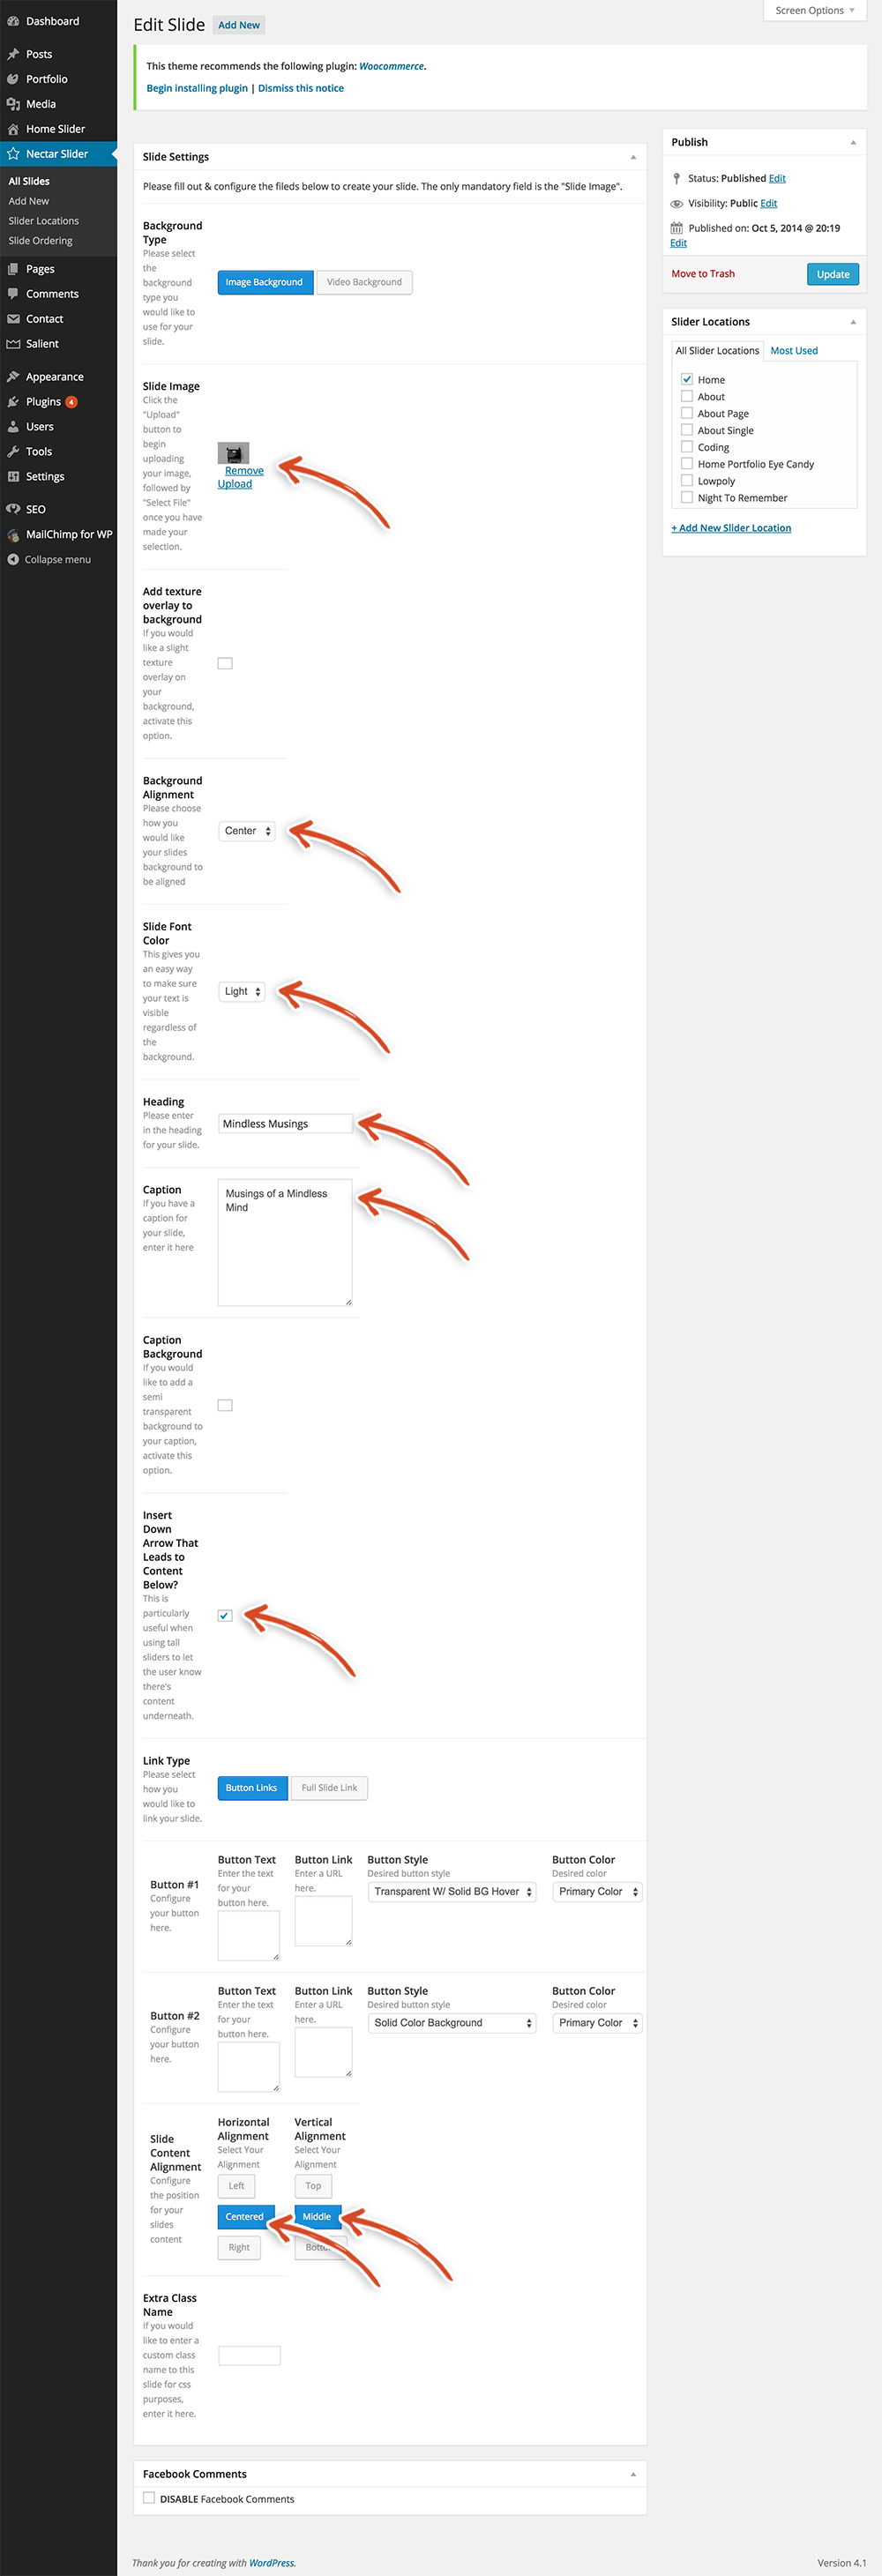
You should see the page below. To create the Slider, do the following things:
- Upload a Slide Image
- Set the Background Alignment field to center
- Set the Slide Font color (we used a light font color but make sure this color contrasts the color of the image that you use – ie if you use a dark image set a light Slide Font Color)
- Add the Heading (in our case Mindless Musings)
- Add the Caption (in our case Musings of a Mindless Mind),
- Check the box next to Insert Down Arrow That Leads to Content Below?
- Set the horizontal alignment to centered
- Set the vertical alignment to middle for Slide Content Alignment
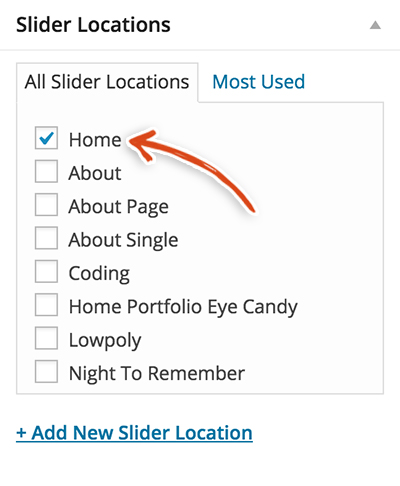
Lastly, select a Slider Location to associate this slide with or Add a New Slider Location. We selected the Home Slider Location. This allows you to show certain slides on certain slide locations. If you do the shortcut option, make sure to create and select Home as the Slider Location (if you don’t it won’t work properly).
Click the blue Publish button and you’ve created a brand spanking new slider!
Create the Homepage Layout
If you’re reading this, we’re assuming you decided to take the path less traveled, the long route. Excellent choice! In coding, as in life, we find that the hard way is often times the easiest.
Let’s finish setting up your homepage. Hover over the Pages tab and click on the All Pages link.

You should see a list of all of the pages on your site.
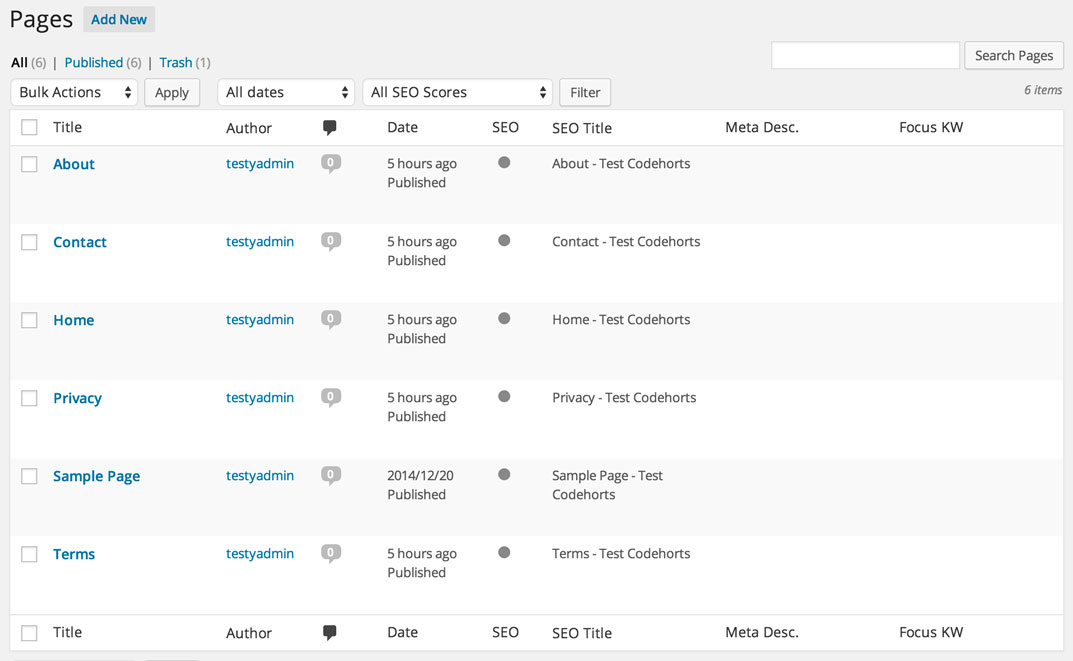
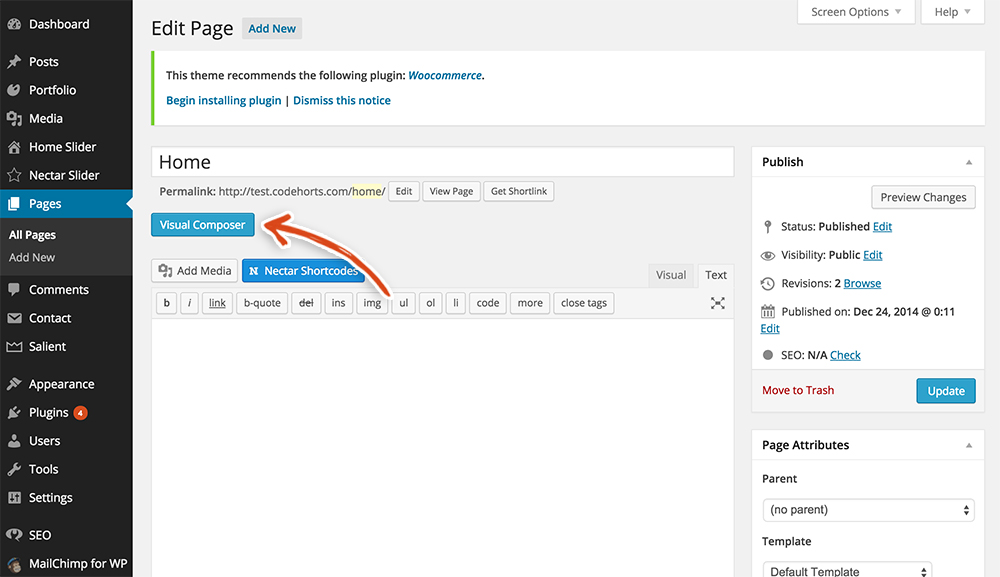
Within the All Pages list, hover over the Home page and click on the Edit link.

You should see something like the page below. Click the Visual Composer button.
In the Salient theme, there are a number of different ways to view the content editor. There is the Classic Editor view and the Visual Composer view. If you know how to code, the classic editor may be the way to go. However, we know how to code and we still find the visual composer much faster for building out your WordPress posts and pages. The main difference is that the classic editor shows the page in a text, or code, view, while the visual composer gives you a visual representation of the page that you can easily drag, drop and edit.
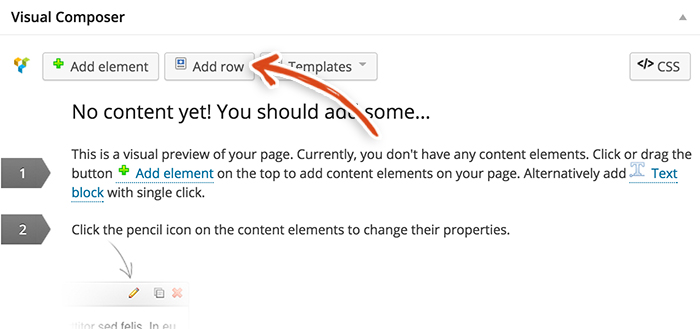
Add a Row with the Visual Composer
Click the Add Row button.
In the Salient theme, a Row is a fundamental building block of WordPress pages and posts. Think of rows as stackable containers, almost like legos; when they are put together, they create a web page.
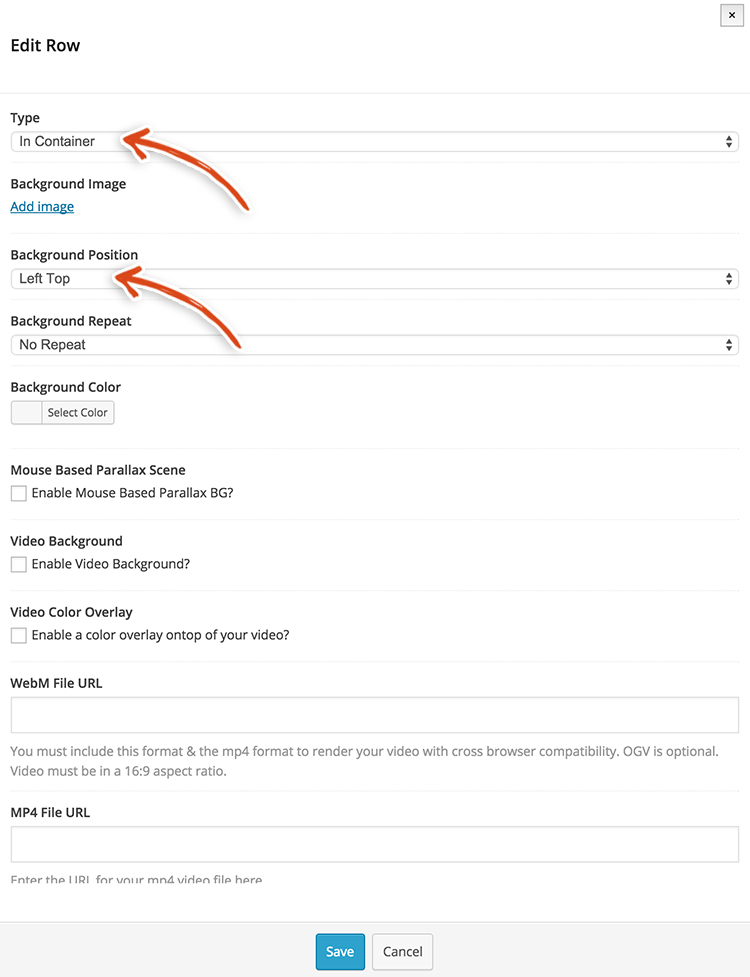
Click the pencil in the top right corner of the row.

Set the Type equal to In Container and Background Position equal to Left Top. Then, click the blue Save button.
Add a Nectar Slider Element
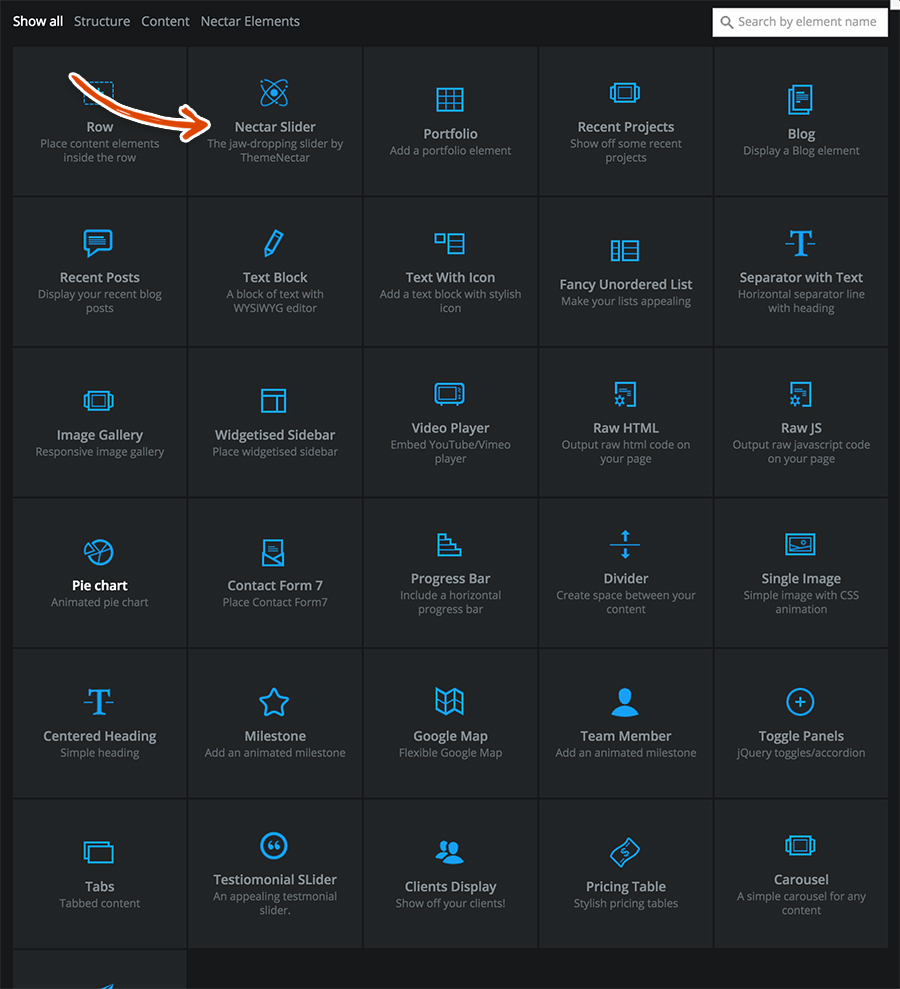
Click on the plus sign within that row. Clicking the plus sign opens a pop-up that contains a bunch of really cool pre-built pieces of functionality created by the Salient Theme builders.

Select Nectar Slider from the list.
 Select the Slider location that you want to display (we associated the Slide that we created earlier in this step with the Home Slider, so that’s the one we’re picking). Check the following boxes:
- Display Full Width
- Full Screen Slider
- Display Arrow Navigation
- Parallax Slider
 Click the blue Save button once you’ve added all of the Nectar Slider settings.
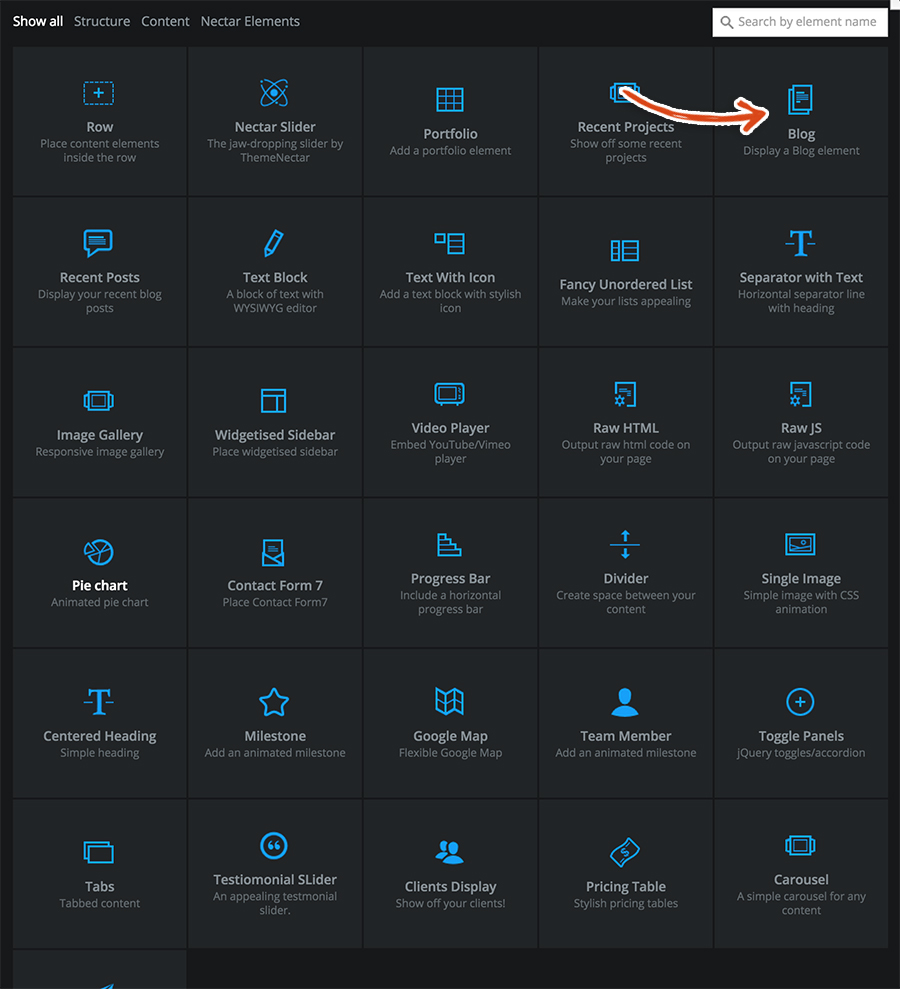
Add a Blog Element
Click the Add Row button to add another row.
 Now, we’re going to add a blog element to the homepage. This is really exciting because the blog element is a magical little piece of functionality. The blog element will embed your blog posts on the homepage so everyone that visits your site can jump right into the content.
Select blog from the list.
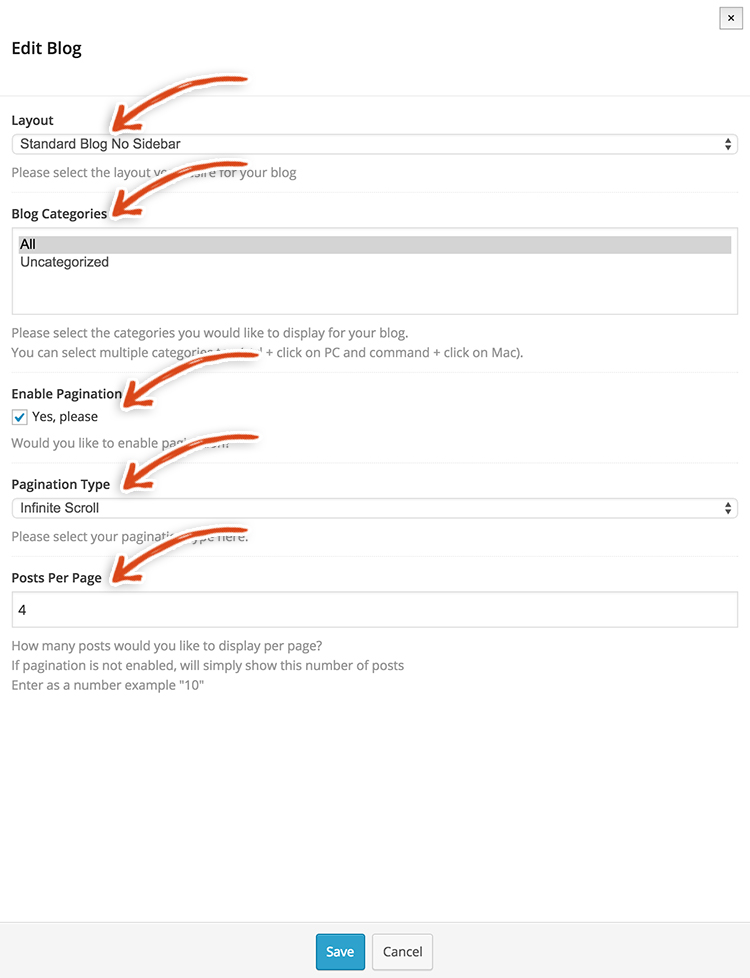
 The blog settings pop-up should open. Select the settings from the Edit Blog modal to the following:
- Layout – Choose the Standard Blog No Sidebar
- Blog Categories – Select All Blog Categories
- Check the box next to enable pagination
- Pagination Type – Select infinite scroll
- Posts Per Page – 4 posts per page
We are only creating 8 posts in this course. Normally, you’d probably want to choose 5 – 10 posts to load per page as you’ll likely have many more than 8 posts. With the infinite scrolling, it will load whatever this number is when a users scrolls down. For example, when you scroll down and the posts per page is set to 4, four posts will load at a time. You might be tempted to make the posts per page 1000 (we tried it, it’s a fun experiment on a friend’s computer, but not on your own) but this will take forever to load and kill your website, so err on the side of a lower number of posts per page.
 Make sure to click the blue Save button. You just added a sweet blog to your homepage! Great work, we’re almost done with the homepage!
Next, click on the pencil icon in the top right corner of the blog row.
 This will pull up the Edit Full Width Section modal. Set the settings to the following, as seen in the screenshot below:
- Type – In Container
- Background Color – #ffffff
- Text Color – Custom with a value of #444444
- Text Alignment – Center
- Padding Top – 0 (zero)
- Padding Bottom – 0 (zero)
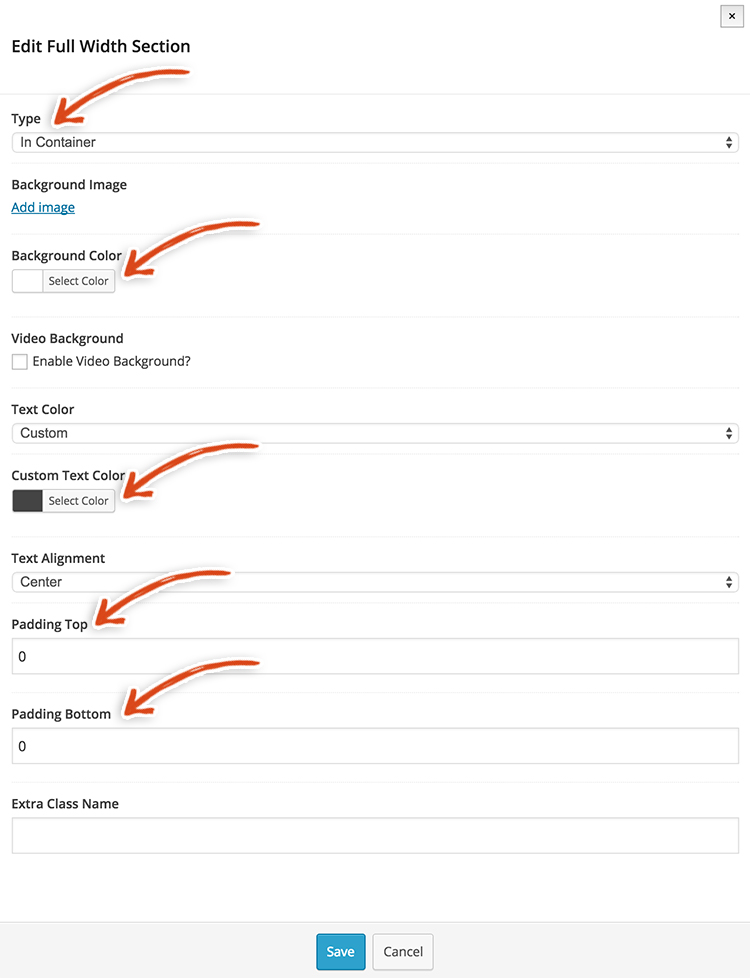 Click the blue Save button to save your changes.
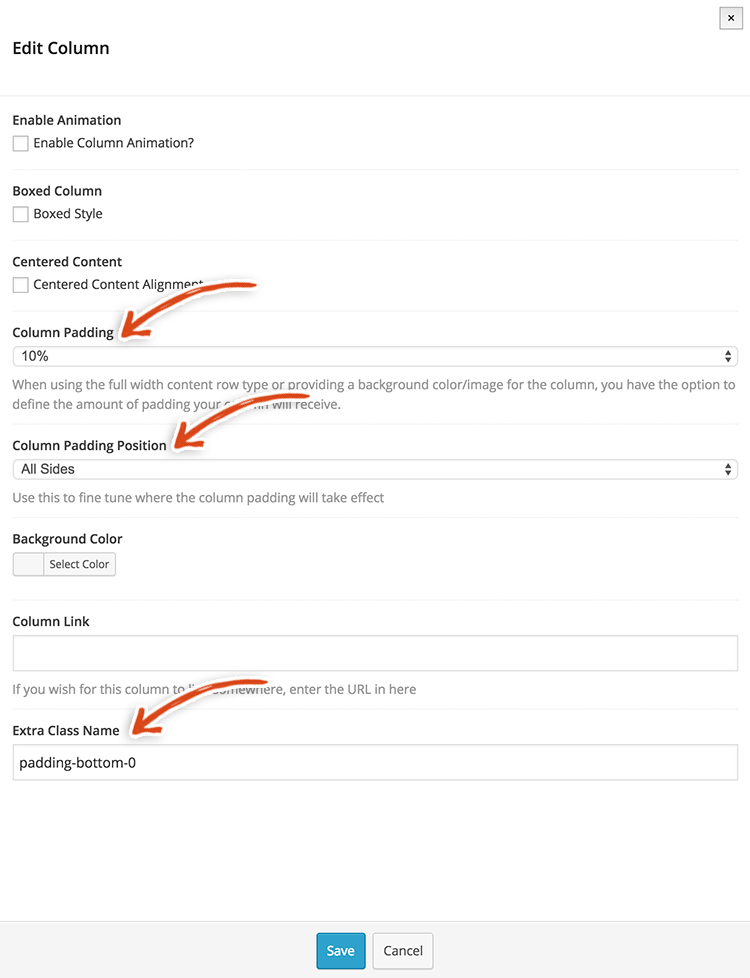
We have one more thing to edit and the homepage will be done! Click on the pencil in the middle of the row section.
 The Edit Column pop-up should open. You’ll want to add the following settings, as seen in the screenshot below:
- Column Padding – 10%
- Column Padding Position – All Sides
- Extra Class Name – type in padding-bottom-0
The padding settings will add padding around the blog content on the page to give the page a lot of nice white space. The Extra Class Name is a CSS class name that we’re adding to the column. We’ll revisit what this field is and why we added this later in the final step of the launch guide.
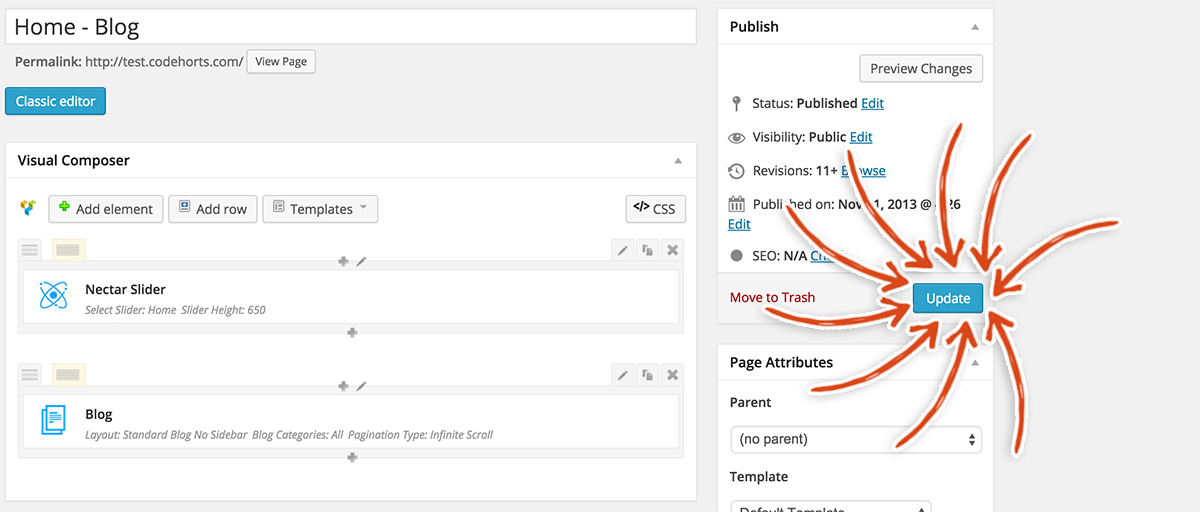
 Give yourself a nice big pat on the back! You’re all done with the homepage! WAIT! NO, you’re not! DON’T MOVE A MUSCLE until you hit that big blue Update button in the corner. If you don’t hit that pretty blue button, all of your hard work won’t get saved. Here’s a picture of the button that you MUST CLICK NOW:
 OK, breath a huge sigh of relief and give yourself a pat on the back and a nice big self-hug.
We’re super excited that you finished the step because you learned a lot of the fundamentals of how the Salient theme works and how to build web pages in WordPress. Next up, we’re going to show you how to build a blog gallery page!
Mission Control Disclosure:
We want to be totally transparent with you about how we are able to spend our valuable time creating these blazing, amazing, fantastically mind fazing free launch guides. We make money by referring you to services that we use and that we believe in. Our recommended products/services come at NO additional cost to you. In other words, you are buying the products/services at the same cost as any other user but you are supporting us by purchasing products after clicking on our links (because we get a commission). We are always looking to improve on what we suggest in order to give you the best recommendations. You keep the lights on and our bellies full and we are really grateful to you for that ![]() . We have absolute gratitude, that defies any latitude, for the magnitude of your loyal attitude. Thank you!
. We have absolute gratitude, that defies any latitude, for the magnitude of your loyal attitude. Thank you!