Step 1: Create a Salient child theme
Follow these instructions from WordPress on how to create a child theme.
Step 2: Copy the existing header.php from the Salient parent theme to create a header.php file in the child theme.
Step 3: Place the following code wherever you want the Google Translate widget to appear. We searched for the secondary_nav menu and placed the following code within the ul (unordered list HTML element) but after the declaration of wp_nav_menu.
<li style="border-left:1px solid #ddd;">
   <div id="google_translate_element"></div>
      <script type="text/javascript">
	 function googleTranslateElementInit() {
	 new google.translate.TranslateElement({pageLanguage: 'en', includedLanguages: 'es', layout: google.translate.TranslateElement.InlineLayout.SIMPLE}, 'google_translate_element');
	 						 }
      </script><script type="text/javascript" src="//translate.google.com/translate_a/element.js?cb=googleTranslateElementInit"></script>
</li>
Step 4: Style the Google Translate Widget to fit your Salient styling
You will likely need to style the Google Translate widget to fit in the secondary menu. We used the following CSS styling rules to do that:
#google_translate_element {
	padding-top:7px;
	padding-bottom:4px;
}
.goog-te-gadget-simple {
	border:0!important;
	background:#f8f8f8!important;
}
.goog-te-gadget-simple .goog-te-menu-value {
	padding-bottom:0;
	padding-top:4px;

}
.goog-te-gadget-simple .goog-te-menu-value:hover span, .goog-te-gadget-simple .goog-te-menu-value:hover span:last-child {
	color:#d15420!important;
	-wekbit-transition:color 0.2s linear!important;
	-moz-transition:color 0.2s linear!important;
	transition:color 0.2s linear!important;
}
.goog-te-gadget-simple .goog-te-menu-value span {
	border:0!important;
	color:rgba(0,0,0,0.55);
	font-size:11px!important;
	font-family:'Open Sans'!important;
	font-weight:600;
}
.goog-te-menu-value span {
	border-right:0;
}
.goog-te-menu-value span:last-child {
	padding-left:3px;
	margin-top:3px;
}
#google_translate_element img {
	float:left;
}
The styling rules may not exactly match your styling but they give you a good idea of how to do it and which elements will likely need to be styled.
Step 5: End Result
Here’s what the whole thing looks like at the end of the day:

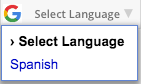
And, if you click on the Select language link, you’ll see the following dropdown menu.
Here’s what the menu looks like after clicking on Spanish:

No If you would like to edit the styling of the Google Translate Widget, check out our post on the topic at https://blog.wplauncher.com/customize-style-of-google-translate-widget/.
If you would like to increase organic traffic to your website from non-English speaking people, using a multilingual plugin for WordPress is the way to go. It allows you to rank and in Google for an English keyword and the keyword in a different language. We put together the following post to show you how to do this.