We have compiled a series of steps involved in creating a professional WordPress plugin settings page. The settings page allows admin users to add their settings for a plugin. This article shows you how to do the following:
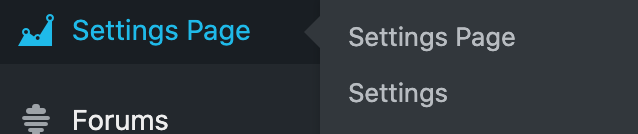
- Add your admin menu to the left sidebar in the admin dashboard along with a submenu item including your settings page
- Create a settings page that includes a form
- Save that form to a database
- Make sure the settings page’s form fields are pre-populated if it has already been filled out
We also have a GitHub repository listed at the end of the article that includes all of the functions below in a working version of a WordPress plugin with a simple settings page (in case you have any issues).
A very important note, we use the WordPress Plugin Boilerplate (WPPB) when we build out WordPress plugins. WPPB simplifies the WordPress plugin creation process as everything is well-structured and easy to maintain. If you would like more information on using the WordPress Plugin Boilerplate, check out our post on WordPress Plugin Development for beginners. In that post, we break down the file structure of WPPB and some tricks on how to get started with it more quickly.
Step 1: Add Admin Menu Action to your construct method in the class-plugin-name-admin.php file
This action is how you hook into admin_menu to start the process of adding your plugins menu to the left sidebar in WordPress.
add_action('admin_menu', array( $this, 'addPluginAdminMenu' ), 9); STEP 2: Add the addPluginAdminMenu Method to your class-plugin-name-admin.php file
Copy and paste the following function into your class-plugin-name-admin.php file. You can see that you can add menu pages and submenu pages in the function below. The parameters of those add menu functions determine what shows in your plugin menu.
public function addPluginAdminMenu() {
//add_menu_page( $page_title, $menu_title, $capability, $menu_slug, $function, $icon_url, $position );
add_menu_page(  $this->plugin_name, 'Plugin Name', 'administrator', $this->plugin_name, array( $this, 'displayPluginAdminDashboard' ), 'dashicons-chart-area', 26 );

//add_submenu_page( '$parent_slug, $page_title, $menu_title, $capability, $menu_slug, $function );
add_submenu_page( $this->plugin_name, 'Plugin Name Settings', 'Settings', 'administrator', $this->plugin_name.'-settings', array( $this, 'displayPluginAdminSettings' ));
}
If you want to use a different icon than the chart area icon, you can add a different class name by selecting one from the following page, https://developer.wordpress.org/resource/dashicons/#buddicons-groups.
You can also add a mini-version of your logo instead of the dashicons class by adding an img folder to your admin folder, adding the logo to that folder, and referencing the file path using the following:
add_menu_page( $this->plugin_name, 'Plugin Name', 'administrator', $this->plugin_name, array( $this, 'displayPluginAdminDashboard' ), plugin_dir_url( __FILE__ ) . 'img/logo.png', 26 );You’ll notice that in the addPluginAdminMenu method there’s a reference to the displayPluginAdminSettings and the displayPluginAdminDashboard function. So, we need to add those methods to the class-plugin-name-admin.php file as well.
STEP 3: Add the displayPluginAdminSettings and the displayPluginAdminDashboard Methods to your class-plugin-name-admin.php file
The displayPluginAdminDashboard method allows you to define the page that shows up when a user clicks on your plugin name in the left sidebar in the admin menu. Add the following function to your class-plugin-name-admin.php file:
public function displayPluginAdminDashboard() {
		require_once 'partials'.$this->plugin_name.'-admin-display.php';
  }
The displayPluginAdminSettings function helps to determine what tab you’re on if you have multiple settings forms, it shows any notices WordPress may have, and it specifies the PHP file that is going to actually display the settings page for your plugin. Add the following displayPluginAdminSettings function to your PHP file as well.
public function displayPluginAdminSettings() {
         // set this var to be used in the settings-display view
         $active_tab = isset( $_GET[ 'tab' ] ) ? $_GET[ 'tab' ] : 'general';
         if(isset($_GET['error_message'])){
             add_action('admin_notices', array($this,'pluginNameSettingsMessages'));
             do_action( 'admin_notices', $_GET['error_message'] );
         }
         require_once 'partials/'.$this->plugin_name.'-admin-settings-display.php';
     }
STEP 4: Add the pluginNameSettingsMessages Method to your class-plugin-name-admin.php file
In the displayPluginAdminDashboard function, there’s a reference to another function called pluginNameSettingsMessages. This function is helpful when debugging.
public function pluginNameSettingsMessages($error_message){
         switch ($error_message) {
             case '1':
                 $message = __( 'There was an error adding this setting. Please try again.  If this persists, shoot us an email.', 'my-text-domain' );
                 $err_code = esc_attr( 'plugin_name_example_setting' );
                 $setting_field = 'plugin_name_example_setting';
                 break;
         }
         $type = 'error';
         add_settings_error(
                $setting_field,
                $err_code,
                $message,
                $type
            );
     }
STEP 5: Add the plugin-name-admin-settings-display.php to partials directory
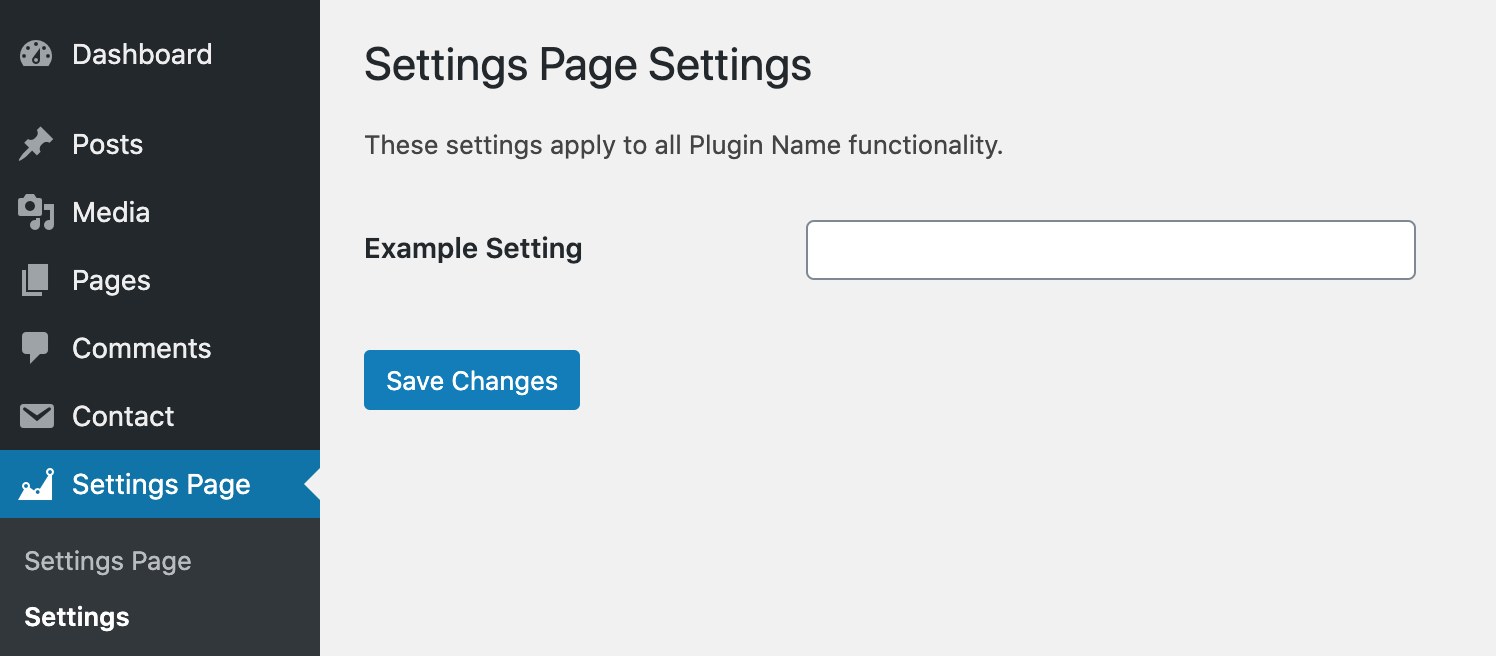
In the displayPluginAdminDashboard function, there’s a reference to a template file called plugin-name-admin-settings-display.php, so we need to add that to the partials directory. This template file is what is used to render your settings page and the form that appears on that page.
<?php

/**
 * Provide a admin area view for the plugin
 *
 * This file is used to markup the admin-facing aspects of the plugin.
 *
 * @link       plugin_name.com/team
 * @since      1.0.0
 *
 * @package    PluginName
 * @subpackage PluginName/admin/partials
 */
?>
<!-- This file should primarily consist of HTML with a little bit of PHP. -->
<div class="wrap">
		        <div id="icon-themes" class="icon32"></div>
		        <h2>Plugin Name Settings</h2>
		         <!--NEED THE settings_errors below so that the errors/success messages are shown after submission - wasn't working once we started using add_menu_page and stopped using add_options_page so needed this-->
				<?php settings_errors(); ?>
		        <form method="POST" action="options.php">
		            <?php
		                settings_fields( 'plugin_name_general_settings' );
		                do_settings_sections( 'plugin_name_general_settings' );
		            ?>
		            <?php submit_button(); ?>
		        </form>
</div>
STEP 6: Build the fields on the settings page by adding the following to the construct method
You need to hook into admin _init in order to start the process of creating your settings form.
add_action('admin_init', array( $this, 'registerAndBuildFields' ));Step 7: Add registerAndBuildFields method to your construct method of admin.php file
Because you’re referencing the registerAndBuildFields function in the admin_action hook above, you need to add that to your admin.php file. This file is where you define what fields you want to include in your settings form and it hooks up to another function that handles saving and pre-population of your form if users have already filled it out.
Pay close attention to the wp_data parameter in this function as it determines how you want this field to be treated by WordPress. On settings pages, you want to set this parameter as an option because plugin settings are typically applicable globally to your WordPress site. However, if you used this function in a custom post type, you would want to use post_meta, so that the information was attached to a post
It’s important to understand the difference between WordPress options and WordPress postmeta. As a refresher, options are global whereas postmeta are specific to post. Check out our post on this topic for more information: https://blog.wplauncher.com/difference-between-wordpress-options-and-wordpress-postmeta/
public function registerAndBuildFields() {
         /**
        * First, we add_settings_section. This is necessary since all future settings must belong to one.
        * Second, add_settings_field
        * Third, register_setting
        */
add_settings_section(
      // ID used to identify this section and with which to register options
      'plugin_name_general_section',
      // Title to be displayed on the administration page
      '',
      // Callback used to render the description of the section
       array( $this, 'plugin_name_display_general_account' ),
      // Page on which to add this section of options
      'plugin_name_general_settings'
    );
    unset($args);
    $args = array (
              'type'      => 'input',
              'subtype'   => 'text',
              'id'    => 'plugin_name_example_setting',
              'name'      => 'plugin_name_example_setting',
              'required' => 'true',
              'get_options_list' => '',
              'value_type'=>'normal',
              'wp_data' => 'option'
          );
    add_settings_field(
      'plugin_name_example_setting',
      'Example Setting',
      array( $this, 'plugin_name_render_settings_field' ),
      'plugin_name_general_settings',
      'plugin_name_general_section',
      $args
    );


    register_setting(
            'plugin_name_general_settings',
            'plugin_name_example_setting'
            );

}
Step 8: Add plugin_name_display_general_account in admin.php file
The plugin_name_display_general_account method is referenced in the registerAndBuildFields function so you need to add it to the file. This is the description on the settings page that explains why you need the information.
public function plugin_name_display_general_account() {
	  echo '<p>These settings apply to all Plugin Name functionality.</p>';
	}
Step 9: Add plugin_name_render_settings_field in admin.php file
This method is referenced in the registerAndBuildFields function so you need to add it to the file. This function is super powerful. We added it to reduce the number of lines of code that we have in our plugins and to automatically save and populate inputs based on the specified option name (relevant to the settings page) or postmeta key (more relevant for custom post types) associated with that setting. It will also handle saving serialized or normal values. It will save you a ton of time. The registerAndBuildFields function above is much smaller and more readable as a result of this function.
Since this post, we have added to this function so that it adds the ability to use select boxes in your plugin settings page. Shoot us an email if you would like us to send it to you https://wplauncher.com/contact.
public function plugin_name_render_settings_field($args) {
         /* EXAMPLE INPUT
                   'type'      => 'input',
                   'subtype'   => '',
                   'id'    => $this->plugin_name.'_example_setting',
                   'name'      => $this->plugin_name.'_example_setting',
                   'required' => 'required="required"',
                   'get_option_list' => "",
                     'value_type' = serialized OR normal,
         'wp_data'=>(option or post_meta),
         'post_id' =>
         */
   if($args['wp_data'] == 'option'){
        $wp_data_value = get_option($args['name']);
    } elseif($args['wp_data'] == 'post_meta'){
        $wp_data_value = get_post_meta($args['post_id'], $args['name'], true );
    }

    switch ($args['type']) {

        case 'input':
            $value = ($args['value_type'] == 'serialized') ? serialize($wp_data_value) : $wp_data_value;
            if($args['subtype'] != 'checkbox'){
                $prependStart = (isset($args['prepend_value'])) ? '<div class="input-prepend"> <span class="add-on">'.$args['prepend_value'].'</span>' : '';
                $prependEnd = (isset($args['prepend_value'])) ? '</div>' : '';
                $step = (isset($args['step'])) ? 'step="'.$args['step'].'"' : '';
                $min = (isset($args['min'])) ? 'min="'.$args['min'].'"' : '';
                $max = (isset($args['max'])) ? 'max="'.$args['max'].'"' : '';
                if(isset($args['disabled'])){
                    // hide the actual input bc if it was just a disabled input the informaiton saved in the database would be wrong - bc it would pass empty values and wipe the actual information
                    echo $prependStart.'<input type="'.$args['subtype'].'" id="'.$args['id'].'_disabled" '.$step.' '.$max.' '.$min.' name="'.$args['name'].'_disabled" size="40" disabled value="' . esc_attr($value) . '" /><input type="hidden" id="'.$args['id'].'" '.$step.' '.$max.' '.$min.' name="'.$args['name'].'" size="40" value="' . esc_attr($value) . '" />'.$prependEnd;
                } else {
                    echo $prependStart.'<input type="'.$args['subtype'].'" id="'.$args['id'].'" "'.$args['required'].'" '.$step.' '.$max.' '.$min.' name="'.$args['name'].'" size="40" value="' . esc_attr($value) . '" />'.$prependEnd;
                }
                /*<input required="required" '.$disabled.' type="number" step="any" id="'.$this->plugin_name.'_cost2" name="'.$this->plugin_name.'_cost2" value="' . esc_attr( $cost ) . '" size="25" /><input type="hidden" id="'.$this->plugin_name.'_cost" step="any" name="'.$this->plugin_name.'_cost" value="' . esc_attr( $cost ) . '" />*/

            } else {
                $checked = ($value) ? 'checked' : '';
                echo '<input type="'.$args['subtype'].'" id="'.$args['id'].'" "'.$args['required'].'" name="'.$args['name'].'" size="40" value="1" '.$checked.' />';
            }
            break;
        default:
            # code...
            break;
    }
}
Compress the parent folder of your plugin and add the plugin to your WordPress installation or, if you’re editing the plugin files within a local development environment, check out your WordPress admin dashboard. You should see your Plugin Name with an icon next to it. When you hover over it, you should see a menu with your Plugin Name and a Settings page. If you click on the Settings page, you will see your handiwork! You can adjust the styling on the admin settings page to match your plugin’s styling if you don’t like what shows up, but that’s all there is to it!
In Case You Have Issues:
In case you run into any issues, here’s a GitHub repository that includes a working version of the code above in a WordPress Plugin using the WordPress Plugin Boilerplate. You can download it and compare it to yours to see if you can figure out any issues you may have had:
Download Simple Settings Page Plugin on GitHub
If you want to rename the different functions, files, and variables to be specific to your plugin, do the following:
- Replace instances of plugin_name_ with your_plugin_name_ (where your plugin name is separated by underscores) in your class-plugin-name-admin.php file. For example: if your plugin is called Settings Page you would replace plugin_name_ with settings_page_.
- Replace pluginName with yourPluginName in camelcase in your class-plugin-name-admin.php file. For example: if your plugin is called Settings Page you would replace pluginName with settingsPage.
- Make sure the name of your display file is called your-plugin-name-admin-settings-display.php
- For example: if your plugin is called Settings Page you would replace plugin-name-admin-settings-display.php with settings-page-admin-settings-display.php.
- Any other references to plugin-name in class-plugin-name-admin.php need to be replaced with your-plugin-name (AKA your plugin’s slug).